several practices relate with git

1 How to install git by “make”

编译基础环境环境和依赖的包


yum -y install gcc make

yum install -y curl curl-devel zlib-devel openssl-devel perl perl-devel cpio expat-devel gettext-devel

对于定制的一些系统,找不到依赖时,可能要修改repo源:http://mirrors.163.com/.help/centos.html:


wget http://mirrors.163.com/.help/CentOS6-Base-163.repo

如果遇到下载不了的,可以手工下载至/var/cache/yum/i386/6/base/packages类似目录

下载和安装:


wget   http://www.codemonkey.org.uk/projects/git-snapshots/git/git-latest.tar.xz

xz -d git-latest.tar.xz

tar -xvf git-latest.tar

cd git-2015-09-07/

autoconf

./configure

make && make install

 ln -s /usr/local/bin/git /usr/bin/git

批处理命令为:


wget   http://www.codemonkey.org.uk/projects/git-snapshots/git/git-latest.tar.xz; xz -d git-latest.tar.xz; tar -xvf git-latest.tar; cd git-2015-09-07; autoconf; ./configure; make && make install; ln -s /usr/local/bin/git /usr/bin/git

 2 Jenkins download git repository timeout error:

Jenkins使用git作为scm时,默认N多操作使用的都是10分钟作为timeout时间的设置,当git clone的repo太大,例如超过1G或下载速度太慢时,会download不了代码:

08:36:53 ERROR: Timeout after 10 minutes

所以要求助git jenkins插件的”Additional Behaviours“修改下timeout的时间以解决timeout问题:

1111111111nfig [Jenkins] - Google Chrome

3 How to download sub folder for GIT in jenkins:

当一个repository太大时,N个JOB如果没有共享workspace,则占用磁盘的空间为N*repo大小,而实际中,我们确实只需要git里面的某一个子目录而已,所以可以使用sparse checkout来解决,同样求助于Additional Behaviours来设置:

2222222222222


4  How to limit git scm poll change path limit:

使用GIT(Github.Gitlab,etc)的web hook的通知,可以让有代码改动时,通知到Jenkins job去自动执行,但是如果想限制某个目录的代码改动才触发Jenkins job,可以同样求助于Additional Behaviours:

hi


 5  Git Merge with remote host.


1006  git clone  https://jiafu@stash-eng-chn-sjc1 /git/stach.git

1023  git remote add remotename https://jiafu@stash-eng-chn-sjc1/git-fork/stach.git

1034  git fetch remotename /feature/930

1045  git merge remotename /feature/930

1046  git status

1061  git checkout -b gate/20161202

1051   fix conflict

1052  git add/commit

1053  git push remotename gate/20161202

6 保存密码

  $ git config --global credential.helper cache
  # 默认缓存密码15分钟,可以改得更长, 比如1小时
  $ git config --global credential.helper 'cache --timeout=3600'

Datastax Cassandra Driver Analyst (7)-Data Structure and Codec

这一小节主要讨论两个问题,一是描述Datastax Cassandra Driver为请求和响应定义的的数据结构;二是在收发数据都经过了哪些编解码。

一、数据结构:

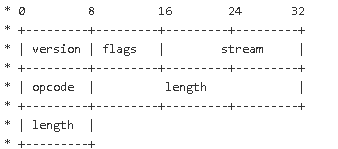
driver发送/接收数据的结构分为两种版本:V1和V2共用的版本和V3使用的版本(如下图):


(1)version, 不解释,V3还是V1/V2

(2)flags, 分两种,使用序列化方式压缩进数据帧内


(header.writeByte(Header.Flag.serialize(frame.header.flags));)

a) TRACING:  Returns whether tracing is enabled for this query or not.

b) COMPRESSED 是否压缩

(3)stream :很关键,标示数据帧的id. 收发一致以保持数据的发送和接收以一个对应起来。

(4)opcode: 编解码方式,例如对于请求,Query类型的opcode是7,从而服务器在接收到Driver发送的请求后,根据7的Requests.Query.coder进行解码,因为明显不同类型的请求的编解码方式是不同的。


STARTUP (1, Requests.Startup.coder),
CREDENTIALS (4, Requests.Credentials.coder),
OPTIONS (5, Requests.Options.coder),
QUERY (7, Requests.Query.coder),
PREPARE (9, Requests.Prepare.coder),
EXECUTE (10, Requests.Execute.coder),
REGISTER (11, Requests.Register.coder),
BATCH (13, Requests.Batch.coder),
AUTH_RESPONSE (15, Requests.AuthResponse.coder);

(5) length: 数据帧Body内容的总长度;

(6)body: 例如对于仅有HashMap属性的Credentials请求类型:

body分为2部分:第一部分为:总的长度(值为下图中x,区别于5);第二部分:数据内容(如下)

ds2

总体代码如下:


header.writeByte(frame.header.version.toInt());
header.writeByte(Header.Flag.serialize(frame.header.flags));
writeStreamId(frame.header.streamId, header, protocolVersion);
header.writeByte(frame.header.opcode);
header.writeInt(frame.body.readableBytes());
return ChannelBuffers.wrappedBuffer(header, frame.body);

二、编解码Codec

了解完数据帧的编码后,我们来了解下netty对收发数据的编解码,首先可以从以下代码可以看出收发数据编解码的过程和顺序:


pipeline.addLast("frameDecoder", new Frame.Decoder());
pipeline.addLast("frameEncoder", frameEncoder);

if (compressor != null) {
pipeline.addLast("frameDecompressor", new Frame.Decompressor(compressor));
pipeline.addLast("frameCompressor", new Frame.Compressor(compressor));
}

pipeline.addLast("messageDecoder", messageDecoder);

pipeline.addLast("messageEncoder", messageEncoderFor(protocolVersion));

pipeline.addLast("dispatcher", connection.dispatcher);

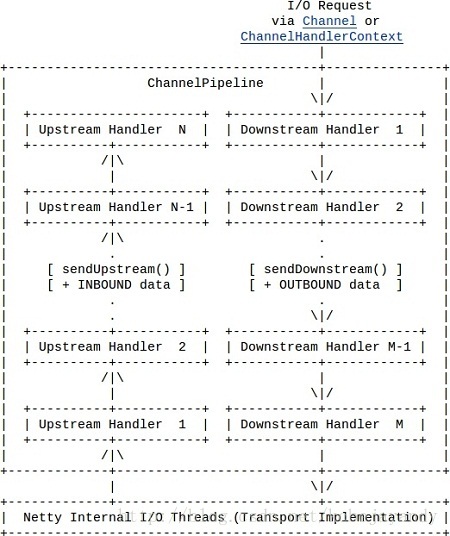
根据netty对收发数据处理的流程(如下图)可知:

20130909221201781


datastax的转化流程图如下:

其中Frame.Decoder()为LengthFieldBasedFrameDecoder;dispatcher为SimpleChannelUpstreamHandler,其他都为OneToOneDecoder


DatastaxDriver-Codec (1)

总结:Driver 对于数据帧的定义方式非常典型:有identify的标记位,有影响后面body处理的压缩等flag,有长度字段和编解码方式字段;同时编解码也挺齐全:有压缩,也有不同请求的封装。

从driver对netty的使用来看,netty确实是强大的网络程序构架框架,相比较自己去一步一步码nio的server/client程序要高效的多。